Tuesday, November 30, 2010

Holiday Gift Guide Part 1

It's the most wonderful time....of the year.  Come on, sing it with me! 

This is the time of year when my children start getting their lists of what they want/need/deserve ready and every toy we pass in the store is something they simply MUST have.

This is the time of year when many parents I know make themselves crazy with worry and doubt in trying to find the perfect gift.

This year, I decided to do a little Holiday Gift Guide with some of our favorite things.  These are items that my children love and I think yours will too!


We are really big with creative play around here.  Playsilks from Nova Natural are at the top of our list.  We first got some of these the year Seth was 2.  Immediately, they became a cape for our masked crusader.


They have since become headscarves, slings, princess dresses, rock star outfits, really anything you can imagine.


003

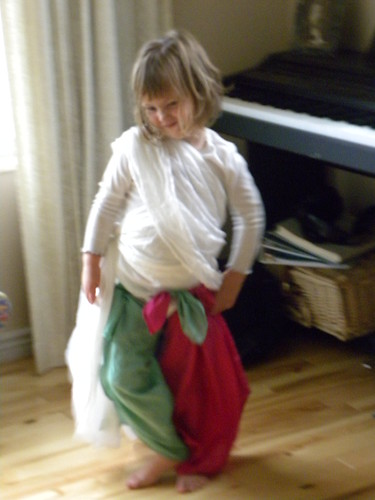
Or maybe I should say, they have become anything my children can imagine.  These have been such a great investment and I have not regretted once having bought them.

On the same creative note, my children LOVE Play-doh.  This is something that I can get out and they will sit for HOURS and play with each other.  They love to mix the colors (which kills me a little bit), create new things and when they're done, put it away to start again another day.


This year at Blogher, I was able to meet the great folks from Play-Doh.  They were kind enough to send my kiddos this great new set, the Dog and her Puppies.  They have had so much fun with this, and really so have I!

We love reading in our house.  Anything that will capture my childrens' imaginations and is fun for me to read too, is a big plus!  I have talked about these books before, but my holiday guide wouldn't be complete without mentioning them!!  The How to Train Your Dragon Books are perfect for your little Viking.  They are really quite different from the movie, I think only similarities are the names, so they are a lot of fun to read for everyone!

Next to Legos, Automoblox are a favorite toy around my house.  All of my kids (including Jeremy) love them.  Being able to mix and match and build different cars is so much fun for them. 


I love that they are made of wood, my kids love the colors, and how fast they go!  We have started out with the Mini Set.  It comes with the 3 you see above for only $30.  These are a must have for your little car loving kiddo!

These are just a few of my kiddos favorite toys and all are very affordable, which is vital for our family!

*I was not compensated for any of this post.  I wrote about things I love and have bought with my very own money, except for the Play-Doh (which was sent to me by the great folks at Blogher).

Stay tuned for Part 2 which will have some great giveaways!!!

Monday, November 29, 2010

I Might Miss This...

I really might miss the first snowfall of the year and the beauty and magic it brings.


But then again....I might not.  Especially considering that when it snows again, I will be the one shoveling.  So, while I probably will miss the first snow, I won't miss the rest of them!

Friday, November 26, 2010

Giving Thanks

I do love this time of year.  I love reflecting on all of my many blessings.  I love gathering with family and friends and sharing good great food.

I love the sights, smells and sounds of the season.  I love every part of it.

I love that Seth is starting to understand more about the holidays.  He came to me right before Thanksgiving and said, "Mom, I have a great idea.  How about after we eat, we all sit in a circle and say what we are thankful for". 

I want to share a few of the things I am thankful for with you.


These people make my heart soar and my days bright.  They keep me warm at night (by all crowding in my bed) and help keep my feet on the ground.

I hope you had a fabulous Thanksgiving and take a moment to remember all that you have to be thankful for.

I am so grateful for each of them and the joy and peace they bring into my life.

Sunday, November 21, 2010

The Don Draper Effect

I love Mad Men.

I love Don Draper.

My husband disapproves of me loving Don Draper.  Not because it's another man, but because he's a wee bit slimy.


I mean, come on, just look at him.  What is not to love?  The fact that he is a chain smoking, womanizing, alcoholic is just minor really.

But, I have to say, I am not thrilled with Don right now.  You see, Jeremy and I began watching Mad Men from Season 1, in July.  At that time, I started knitting my February Lady sweater.


Gorgeous is it not?  This is not my completed sweater however.  This is the sweater that the lovely designer created, the one I want to emulate.

I have been working hard to get my sweater done.  Working every night as we watched Mad Men, as we have watched our other shows, taking it with me everywhere I go really.

I had about 10 inches done from the armpits down and realized somewhere along the line I had lost 10 stitches.  I studied my sweater, trying to figure out where and when and HOW that happened.  Then I saw it.  There was a spot, about 3 inches into the sweater, where I obviously messed up. 

This was the spot where Don Draper did something that I really did not agree with (probably in Season 3 or something) and I lost some stitches.

I got distracted from my knitting by the oh so handsome man on the television and I didn't even notice it. 

I lived in denial for a bit, pretending that it wasn't as bad as it was.  I told myself it was ok, and that only God makes perfect things, so a little mistake wasn't a big deal.

Except it wasn't a little mistake.  It was obvious and glaring.  I asked Jeremy if I should rip it out and he said that he thought it was ok.  I asked Nicole (another knitter) the same thing and she said that she wouldn't.  I asked my sister Stephanie, the one who taught me to knit, what she thought.  She told me to rip it out right away.

Jeremy agreed.

Apparently he didn't want to tell me this before.  It was a lot of work.  I think he was scared of me a little and until Stephanie said something he didn't dare.  Something about pregnancy hormones.

Listening to my mentor, I did it.  Stephanie and I sat on her couch and I ripped out 10 inches of my sweater last night.  I may have cried a little and cursed Don Draper a lot.

Moral of this story:  Don't knit anything other than a garter stitch when watching Mad Men.  The Don Draper effect will break your heart and ruin your knitting.

Trust me.

Thursday, November 18, 2010

The More Things Change...

They dance at my feet listening to Rudolph the Red Nosed Reindeer and Jingle Bells, loving this time of year. 

They watch out the window waiting for snow, waiting for the magic it brings.

They play at my feet with Legos, babies and coloring books, narrating their stories as they go.

They cook in the the kitchen with me.  They have their kitchen, I have mine.

He goes to school in the morning and comes home in the afternoon.  By noon the girls want to know when he is coming home.

She goes to dance and we run errands while she spins, twirls and taps her little heart out.

We go to Church every Sunday, come home have lunch and rest.


We are preparing for so many changes and while we do, it is nice to know some things stay the same and never change.

Wednesday, November 17, 2010

...Featuring Norah Jones :: Album Review


I have been given the opportunity through One2One Network to review Norah Jones' new album. ...Featuring.  I have long been in love with the vocal stylings of Ms. Jones and was eager to listen to her newest creation.

When I saw that it was duets, I immediately envisioned a CD full of her songs I already knew with other people singing with her.  I was pleasantly surprised however to find that they were songs I really didn't know, and was introduced to several new artists as well.

...Featuring is a star-studded collection of Norah Jones'  collaborations spanning her entire career.  The result serves as a kind of parallel history to her four albums, which have sold over 40 million copies worldwide.

“A  lot of the people on this record are people I've worshiped since I was a  kid, and some of them are younger and more my contemporaries,” says  Norah. “Even though the musicians are so varied, the vibe of the songs  makes sense when we put them all together.”  


 While I love most of this CD, there are a few songs that aren't my favorite and will be removed from my playlist.  I am not a fan of Rap music at all, so I was not impressed with the songs featuring OutKast, Q-Tip and Talib Kweli.  But, with 18 songs on the CD, there really is something for everyone.

This CD is the perfect gift for the Norah Jones fan.  Check it out on YouTube, and Facebook. After you do that, I am sure you will want to go buy it and you really should.


*I received this CD from The One2One Network, but all words, opinions and sentiments are mine.


Sunday, November 14, 2010

Maternity Skirt 101

My favorite jeans to wear are the Secret Fit Belly jeans from Motherhood.  I love the spandex top that gives me full coverage and sucks me in at the same time.

I really wanted a skirt (or 5) that did the same thing.  However, despite my searching, I couldn't find any.  So, I took matters into my own hands and produced this

Cute, no?  I loved making it so much, and it really was so easy, that when I made my next skirt, I took loads of pictures so you all could make this skirt too.

So, here it is, my first tutorial (which means when you have loads of questions because my instructions were clear as mud you better ask).

To make any of the pictures bigger, just click on them.

Super Cute and Sassy Maternity Skirt

Materials
2ish yards of skirt fabric - anything that has a nice drape
1/4 yard swimsuit fabric - you want something with good stretch.


First thing you want to do is either find a skirt pattern you love, or a skirt you love.  This is going to be the template for your pattern.

I took my jeans that I love so much, folded them in half and laid them out.  I then put the skirt I love, again folded in half,  on top of the jeans so I could make my pattern.


Next I got a piece of wrapping paper (my favorite thing to make patterns with) and traced the top so I could have something to pin to the fabric.


This shows my layout.  Now I knew what shape to cut the skirt part in, and how much of the stretchy fabric I would need.

Next, I pinned the top of the skirt down so that I would be cutting where the skirt hits my hips.


Now with your fabric folded in half, lay out your pattern with the front of the skirt on the fold.


Now for the back.

I did the same thing I did for the front, except I turned my jeans around to make my back pattern piece.


After cutting it out, I laid the front that I had already cut out, on top of this.


Now here is something very important.  You see how the pattern piece I cut out curves on the front?  Don't cut that curve.  DO NOT  CUT THAT CURVE!!!  I did the first time and I had a great little V in the front of my skirt.  Just make it square as you can see I did in the picture.

Now that you have both sides cut out, serge or sew them together, right sides facing together.

Now it is time for the waistband.

As you can see when looking at the jeans and my drawing of what I wanted the top to look like, the front was going to be longer than the back.  With two little ones running around my sewing room and asking to listen to Jingle Bells, I couldn't concentrate enough to do that.  So, I just made my waistband all one size.  It works and I love it.

For my waistband measurement, I took the fabric and measured it against my jeans to get the right width.  I cut two of these and serged right sides together.

If you don't have a pair of jeans that you love like I do, just take the stretchy fabric and put it around your waist until it is comfortable.  You don't want it so tight that it cuts off the circulation, but you want it tight enough to stay in place.

After I had my right sides serged together, I folded it like I would fold the top of a sock down, wrong sides together.  This makes it two layers thick.  Now you don't have to do this, but if you don't, you will want to make a small hem at the top.


You can see that the waistband is much smaller than the skirt.  This is good, you want it this way.


Pin the waistband to the skirt, right sides together.  I pin at each side, matching up seams and the center front and center back.

 Now baste this together.  Basting is using a long stitch, I set my machine at a 4, so that it is easy to rip out if I need to.

Try on your skirt and be sure it fits how you like.  If it doesn't, then take out the stitches you just did and redo the waistband.  Lucky for me, it was perfect, so I was ready to serge.


 When you start to serge it (or do a zigzag stitch on your sewing machine) you will see that it is a bit bunched up.  Stretch it out while you sew, being sure that the fabric lays flat.


Now it's time to hem this baby up.  Try it on again and check the length.  Mine was a lot longer than I wanted, so I actually ended up cutting off about 4 inches.   Pin it where you want it and make a nice hem.


This next step is extremely important.  Try it on and have your 4 year old take a picture so you can share it with the world.  Be sure that your undies are cutting into your belly so it looks like you have two.  I can't stress the importance of this step enough.


Now, find the perfect sassy maternity shirt and show off your Sassy Self for all the world to see!


You just made a skirt and it wasn't too painful, now was it??

Questions??  Please ask.  I will answer all questions in the comments, so everyone can see.  Share what you made with me, I can't wait to see!!!

*With the first skirt I made, I used a different skirt as my pattern than the second.  So, the first one is a bit more full than the second.  The skirt pattern I used for the red and gray skirt is adapted from the Amy Butler Barcelona skirt pattern.